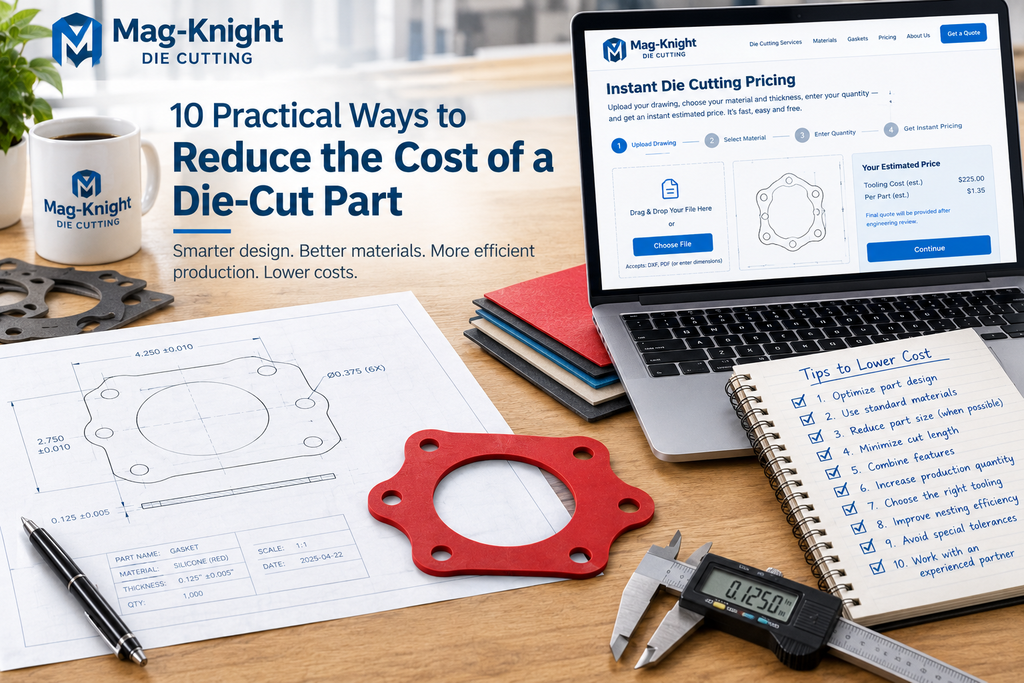
The fastest ways to lower the cost of a die-cut part are to order larger quantities, loosen tolerances where function allows, choose a similar but less expensive material, simplify the part so it cuts more easily, and consolidate your orders under a standing yearly PO. Most parts can improve on two or three of these at once, and the savings stack. Below are the ten levers we see make the biggest difference at Mag-Knight, with the reasoning behind each so you can decide which fit your part.
1. Order Larger Quantities
Tooling and setup are fixed costs, so the more parts you spread them across, the less each part carries. A $200 die spread across 100 parts adds $2.00 to every part. Spread across 1,000 parts, it adds $0.20, and across 10,000 parts, $0.02. Press time works the same way, since a longer run keeps the press cutting continuously instead of stopping for changeovers. If you know your annual usage, ordering closer to that number in fewer releases is usually the single biggest price lever you have. See our cost breakdown for how die cost and production cost combine into a per-part price.
2. Loosen Tolerances Where Function Allows
Standard die-cutting tolerances are tighter than many parts actually need. When a drawing calls for tolerances tighter than standard, we may need to perform SPC (statistical process control), which means measuring parts during the run and charting the results. That inspection time is real cost. If a dimension doesn’t affect fit or function, loosen it, and apply tight tolerances only to the features that truly need them. Our engineering library has more on which tolerances are realistic for different materials.
3. Choose a Similar but Less Expensive Material
Material is often the largest line item on a part, and many applications are specified with a more expensive material than the job requires. If your gasket sees moderate temperatures and light compression, a lower-cost rubber or foam grade may perform identically to the premium one on your drawing. Check the temperature, chemical, and compression requirements, then compare alternatives. The instant pricing tool makes this easy, since you can price the same part in several materials in seconds and see the difference side by side. Our suitable materials page lists what we regularly run.
4. Make the Part Easier to Cut
Parts with less detail cost less to tool and run. A few design habits make a real difference:
Keep holes away from edges. Holes placed too close to an edge are hard to cut cleanly and can distort the part. Give them room.
Avoid closely spaced parallel lines. Narrow webs between cut lines are fragile in both the die and the part.
Respect bend radius limits. Softer materials cut with thin rule can hold a bend radius around 1/16″, while harder materials need thicker rule with a minimum radius of 3/32″. Designing to these limits avoids a die that is expensive to build or wears faster.
Reduce unnecessary detail. Every extra feature adds bending, setup, and potential for scrap.
The instant pricing tool flags hard-to-cut features right on your drawing, so you can fix them before requesting a quote.
5. Place a Standing Yearly PO
If you use the same part throughout the year, a standing PO that you fulfill with scheduled releases lets us plan material purchases and press time around your demand instead of treating each order as a one-off. You get the volume benefit of a larger commitment without taking delivery of everything at once. Ask us about structuring one through our quotation page.
6. Standardize on Stocked Materials and Thicknesses
Materials we run regularly are easier to source and cut than specialty items. Where your design has flexibility, choosing a common thickness and material grade over an unusual one can reduce both material cost and lead time.
7. Use Material Efficiently
How parts sit on a sheet affects how much material is scrap. Simple, compact shapes nest well, and slight changes to a part’s outline can sometimes allow noticeably better yield. If you’re flexible on a dimension, ask whether adjusting it would improve material utilization.
8. Consolidate Similar Parts
If you order several parts that are close variants of each other, ask whether one design could serve more than one application, or whether related parts could share a die layout. Fewer unique parts means fewer dies and fewer setups.
9. Keep Your Existing Die and Avoid Revisions
When Mag-Knight builds your die, you own it and we store it in-house for future orders, so reorders don’t carry tooling cost again. Design changes after the die is built can mean modifying or replacing it, so finalize the design before tooling. If the design may still change, rapid prototyping with laser cutting lets you validate the part first. Our laser vs. die cutting comparison explains when each process makes sense.
10. Supply Your Own Material
If you already buy material at a better price, or have inventory on hand, you can supply it. Tell us when you request pricing and we’ll build the estimate around your material.
Cost Levers at a Glance
Lever
What to Change
Typical Impact
Quantity
Order more per release, or consolidate releases
High
Standing yearly PO
Commit annual volume with scheduled releases
High
Material choice
Switch to a similar, lower-cost material
High
Tolerances
Loosen where function allows, avoiding SPC
Medium to High
Part geometry
Fewer details, holes off edges, no tight parallel lines
Medium
Customer-supplied material
Provide your own stock
Medium
Material yield
Adjust shape or size for better nesting
Low to Medium
Part consolidation
Fewer unique parts and dies
Low to Medium
Impact is general guidance. The size of the savings depends on your part, material, and volume.
See the Difference Before You Commit
The easiest way to test these ideas is to price your part more than once. Upload your drawing to the instant pricing tool, then change one variable at a time, such as material or quantity, and watch the estimate move. When you’re ready for a firm number, request a quotation and our engineers will review the part and suggest further savings, from custom die cutting design tweaks to gasket material swaps.
Frequently Asked Questions
What is the biggest factor in die-cut part cost? For most parts it’s quantity and material. Larger quantities spread fixed tooling and setup across more parts, and material is often the largest direct cost on the part.
Does loosening tolerances really lower the price? Yes. Tolerances tighter than standard can require SPC (statistical process control) inspection during the run, which adds time and cost. Loosening tolerances on non-critical dimensions avoids that.
How can I lower cost without changing the material? Increase quantity, simplify the part geometry, keep holes away from edges, avoid closely spaced parallel lines, and consider a standing yearly PO with scheduled releases.
What is a standing yearly PO? It’s a purchase order covering your expected annual usage that you fulfill with scheduled releases throughout the year. It gives you volume pricing benefits without taking delivery of everything at once.
Why do holes near the edge increase cost? Holes placed too close to an edge are harder to cut cleanly and can distort the part, which increases scrap and die wear. Moving them inward makes the part easier and cheaper to cut.
Can I supply my own material to save money? Yes. If you have a better source or existing inventory, tell us when you request pricing and we’ll build the estimate around it.
How do I see how a design change affects price? Use the free instant pricing tool. Upload your drawing, change the material or quantity, and compare estimates immediately.
Want help trimming cost on a specific part? Request a quote with your drawing, or reach out through our contact page and our engineering team will suggest where to save.
If you’ve ever sent a die-cut part drawing to a vendor and waited two or three days just to find out whether it’s even in a reasonable price range, that’s not unusual, it’s the norm for this industry. Here’s why that delay exists, and how to get a real budget number in seconds instead, using Mag-Knight’s instant pricing tool as an example of the alternative.
Why Die Cutting Pricing Traditionally Takes So Long
Die-cut part pricing depends on several things that aren’t obvious from a part drawing alone: tooling complexity, material hardness, feature count, and production volume all interact to set the final number. Most shops handle that by having a person manually review every drawing before quoting, which means your request sits in a queue behind everyone else’s until someone has time to look at it. That’s a reasonable process, but it means a simple budget question like “is this part going to cost $0.20 or $2.00 each” often takes as long to answer as a fully firm quote would.
The result is that engineers evaluating die cutting early in a project, before they’re ready to commit to a vendor, often can’t get even a rough number without starting a sales conversation they’re not ready for yet.
What Changed
Mag-Knight built a free instant pricing tool that answers the budget question immediately, without waiting on a person’s schedule. You upload a DXF or PDF drawing, pick a material and thickness from hundreds of combinations (or tell us you’re supplying your own), and get price ranges per part and tooling cost across several quantities back in seconds. If something in your design would be hard to cut, like a hole placed too close to an edge, it gets flagged right on the drawing before you’ve spent any time on it.
This isn’t a replacement for a formal quote. Every estimate that moves forward is still reviewed by Mag-Knight’s engineering team before becoming a firm number, which is what keeps the estimate grounded in reality rather than being a generic calculator guess. What it replaces is the wait to find out whether a conversation is even worth having.
Who This Actually Helps
This matters most for a few specific situations:
Early-stage design. If you’re still deciding whether die cutting is even the right process for a part, getting a rough number in seconds, instead of a day, lets you keep moving instead of stalling on a decision.
Budget approval. If you need a defensible cost estimate to bring to a manager or a client before committing to a vendor relationship, having a number in hand immediately is a real advantage.
Comparing processes. If you’re weighing die cutting against laser cutting for a part, having fast die-cutting numbers lets you make that comparison without waiting on two separate vendor responses.
Why This Is Rare in Die Cutting Specifically
Instant online pricing is common in some manufacturing categories, like sheet metal fabrication or 3D printing, where parametric cost models are relatively mature. Die cutting hasn’t followed the same path as quickly, partly because tooling decisions (steel rule thickness, bend radius limits, die layout) depend on material behavior that’s harder to generalize into a simple calculator. Building a tool that handles that complexity while still returning an answer in seconds is part of why very few die-cutting shops offer anything like this today.
Frequently Asked Questions
Why does die cutting pricing usually take so long to get? Because tooling cost depends on several interacting factors, material, feature complexity, and volume, most shops have a person manually review each drawing before quoting, which creates a queue.
Can I get die cutting pricing without talking to a salesperson first? Yes, with Mag-Knight’s instant pricing tool you can upload a drawing and get a price estimate immediately, with no call required until you’re ready for a formal quote.
Is an instant estimate as accurate as a formal quote? It’s designed to be a reliable budget number, not a final price. Every estimate that becomes a formal quote is reviewed by an engineer first, since some details aren’t always fully visible from a drawing alone.
Does instant pricing work for every material? The tool covers hundreds of material and thickness combinations already. If yours isn’t listed, you can indicate you’re supplying your own material.
Does this replace getting a formal quote? No. It answers the budget question immediately so you know whether to move forward. The formal quote step, reviewed by Mag-Knight’s engineering team, still happens before any order.
Whether you need a gasket, seal, foam pad, insulation component, adhesive-backed part, plastic component, or another custom die-cut shape, providing a few key pieces of information can help a die-cutting company determine the right material, manufacturing process, tooling, quantity, and price.
At Mag-Knight Die Cutting, we work with engineers, purchasing departments, designers, manufacturers, and companies of all sizes. Sometimes a customer sends us a complete CAD drawing. Other times, they have a PDF, a sample part, or simply an idea of what they need.
The more information you can provide, the faster and more accurately we can evaluate your project.
The good news is that you don’t need to have every answer before you contact us.
If you’re unsure about the material, manufacturing process, tolerances, or even how the part should be made, tell us what the part needs to do. That information can be just as valuable as the drawing itself.
What Makes a Good Die-Cutting RFQ?
A good RFQ doesn’t necessarily have to be complicated.
Here’s an example of a useful request:
Part: Custom enclosure gasket Material: EPDM Thickness: 0.062 inch Quantity: 500 initially; approximately 5,000 annually Drawing: DXF and PDF attached Tolerance: ±0.010 inch unless otherwise specified Application: Outdoor electrical enclosure Environment: Outdoor exposure, moisture, temperature variation Adhesive: None Prototype: No — production part Additional information: Please recommend the most economical die-cutting process.
That gives the manufacturer enough information to begin evaluating the job.
The 8 Things You Should Include With a Die-Cutting RFQ
For most projects, the following information will give a die-cutting manufacturer what they need to begin evaluating your job:
Part drawing or CAD file
Material
Material thickness
Part quantity
Required tolerances
Application or intended use
Adhesive or liner requirements
Prototype or production requirements
Let’s look at each one.
1. Provide a Drawing or CAD File
The single most useful thing you can provide with a quote request is a drawing of the part.
A good drawing should show the finished part geometry and identify the dimensions that matter.
Useful drawing information includes:
Overall length and width
Hole sizes
Slot dimensions
Cutouts
Radii
Material thickness
Critical dimensions
Required tolerances
Material specification
Adhesive requirements
Any special notes
If you have a CAD file, send it along with the drawing.
Mag-Knight’s Quotation page currently accepts PDF, DXF, AI, JPG, and DWG drawing formats.
What if I don’t have a CAD drawing?
Don’t let that stop you from requesting a quote.
Depending on the part, you may be able to provide:
A PDF drawing
A physical sample
A sketch
A photograph
An existing part
An older drawing
A DXF or other CAD file
If you only have a physical sample, tell us that when you request the quote.
2. Tell Us What Material You Need
Material selection can have a major effect on both the manufacturing process and the cost of a die-cut part.
Common die-cut materials include:
Rubber
EPDM
Neoprene
Silicone
Buna-N / nitrile
Viton® / FKM
Foam
EVA
Polyurethane
Polycarbonate
Polyester
PVC
PTFE
Cork
Felt
Fiberglass
Fabrics
Adhesive-backed materials
Gasket materials
Plastic films
Magnetic materials
Other flexible or sheet materials
If you know the exact material specification, provide it.
For example:
EPDM, 60 durometer, 0.062-inch thick
is much more useful for quoting than:
Rubber gasket
If you don’t know the material, that’s okay too.
Tell us what the part needs to do.
For example:
“I need a gasket that will be exposed to oil and elevated temperatures.”
Or:
“I need a soft foam pad to provide vibration isolation.”
Or:
“I need a thin plastic insulator.”
Those application requirements can help determine which materials should be considered.
Material thickness is especially important for die-cutting quotes.
Two parts with identical geometry can have very different manufacturing requirements if one is made from 0.020-inch material and the other is made from 0.250-inch material.
Include:
Material: Silicone Thickness: 0.062 inch
If the thickness has a required tolerance, include that as well.
For example:
0.062 ± 0.005 inch
If you’re unsure what thickness is appropriate, tell us what the part does and what the application requires.
Material thickness can affect:
Tooling
Cutting force
Feature size
Part tolerances
Edge quality
Production method
Material handling
Overall cost
4. Tell Us How Many Parts You Need
Quantity is one of the most important pieces of information for a die-cutting quote.
A quote for:
10 pieces
can be very different from a quote for:
10,000 pieces
or:
1,000,000 pieces per year
The quantity helps determine the most appropriate manufacturing process and how tooling costs should be distributed across the production run.
If possible, provide:
Prototype quantity
Initial order quantity
Expected annual quantity
Expected lifetime quantity
You don’t need to know the exact future quantity.
An estimate such as:
“We need 500 initially and expect approximately 5,000 per year.”
is very helpful.
How Quantity Can Affect the Economics of Die Cutting
The chart below illustrates the general relationship between production quantity and the impact of one-time tooling costs.
This is why the expected production quantity is important when comparing die cutting with other manufacturing processes.
A one-time tooling cost becomes a much smaller cost per part as the number of parts increases.
What If I Have a Physical Sample Instead of a Drawing?
A physical sample can still be useful.
If you have an existing part but no CAD drawing, tell us that when requesting a quote.
Depending on the part, a sample can provide information about:
Overall shape
Hole locations
Feature geometry
Material
Thickness
General construction
If possible, provide any information you have about the original material and application.
You can also photograph the sample and include the photographs with your RFQ.
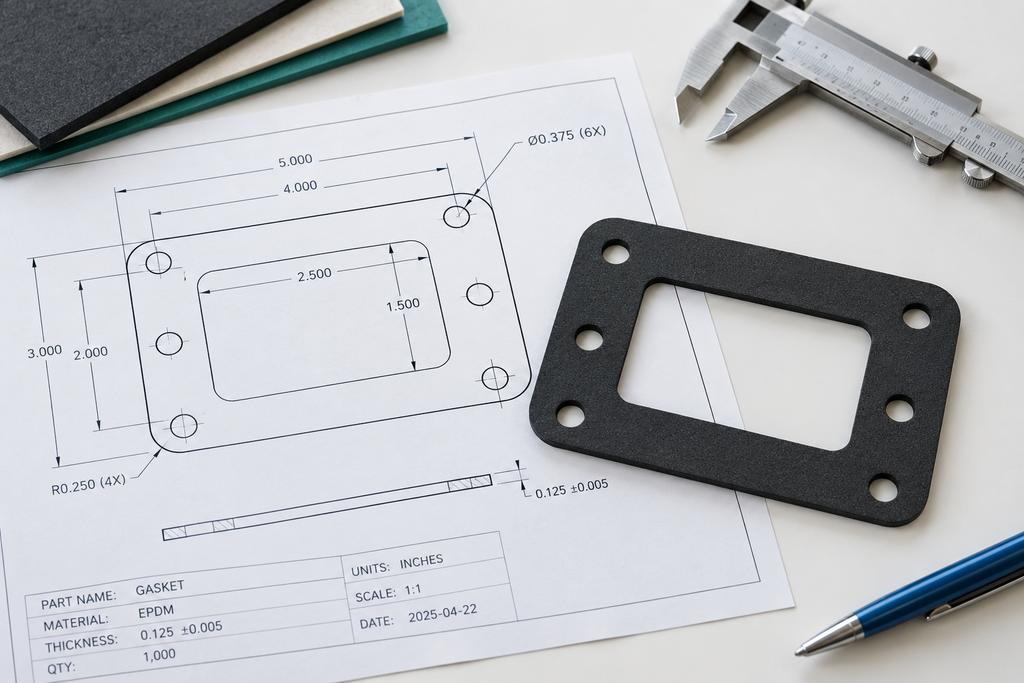
engineering drawing and custom die-cut part for die cutting quote
A Simple Die-Cutting RFQ Checklist
Before submitting your request, check the following:
Part
☐ Part number ☐ Drawing or CAD file ☐ Overall dimensions ☐ Critical features ☐ Hole and slot dimensions ☐ Required tolerances
Material
☐ Material name/specification ☐ Thickness ☐ Hardness/durometer if applicable ☐ Adhesive specification if applicable ☐ Liner specification if applicable
Application
☐ What does the part do? ☐ Temperature range ☐ Chemical exposure ☐ Compression requirements ☐ Environmental exposure ☐ Electrical requirements if applicable
Production
☐ Prototype quantity ☐ Initial order quantity ☐ Expected annual quantity ☐ Production or prototype ☐ Desired delivery date
Special Requirements
☐ Inspection requirements ☐ Packaging requirements ☐ Individual parts or sheets ☐ Kiss cut or through cut ☐ Special certifications or material requirements
You don’t need every box checked before contacting Mag-Knight. If you’re missing information, simply tell us what you know and what you don’t know.
What File Types Can I Send for a Die-Cutting Quote?
Mag-Knight’s Quotation page currently lists these drawing formats:
PDF
DXF
AI
JPG
DWG
A CAD file is especially helpful when the geometry needs to be transferred into tooling.
If you have another format, don’t assume we can’t work with it. Tell us what you have.
How Does the Quote Process Work?
A typical custom die-cutting quote follows a simple process:
1. You send us your part information
Drawing, material, thickness, quantity, application, and any special requirements.
↓
2. We review the part
We evaluate the geometry, material, tolerances, quantity, and manufacturing requirements.
↓
3. We determine the appropriate process
Depending on the job, this could involve die cutting, laser cutting, or another appropriate method.
↓
4. We determine tooling requirements
If a die is required, the tooling cost is included separately from production pricing.
↓
5. We calculate production pricing
Material, press time, quantity, and other job-specific factors are considered.
↓
6. You receive the quotation
The quote provides the information you need to decide how to proceed.
One of the biggest mistakes customers make is waiting until they have a “perfect” RFQ before contacting a manufacturer.
You don’t necessarily need to know:
The exact material
The exact die type
The best cutting process
The exact tooling
Every manufacturing specification
If you have a drawing and know what the part needs to accomplish, that’s a good place to start.
If you have a sample but no drawing, send information about the sample.
If you know the material but aren’t sure about the process, tell us what you’re trying to accomplish.
The purpose of the engineering review is to help determine the most practical way to manufacture the part.
Frequently Asked Questions About Die-Cutting Quotes
What information do I need to get a die-cutting quote?
At minimum, provide the part drawing or sample, material if known, material thickness, quantity, and intended application. Tolerances, adhesive requirements, and special requirements are also helpful.
Do I need a CAD drawing to get a die-cutting quote?
No. A CAD drawing is helpful, but you may also be able to request a quote using a PDF, JPG, physical sample, sketch, or other information. Mag-Knight currently lists PDF, DXF, AI, JPG, and DWG as accepted drawing formats.
What file types does Mag-Knight accept?
The Mag-Knight Quotation page currently lists PDF, DXF, AI, JPG, and DWG drawing formats.
How many parts do I need to order?
There is no single quantity that makes sense for every project. Mag-Knight handles both prototype and production requirements. Providing your expected quantity allows the appropriate manufacturing process and tooling economics to be evaluated.
Does the material affect the die-cutting price?
Yes. Material type, thickness, hardness, availability, and construction can all affect the manufacturing process and cost.
What if I don’t know what material to use?
Tell us what the part needs to do. Temperature, chemicals, compression, flexibility, electrical requirements, and environmental conditions can help determine suitable materials.
What if I don’t know whether my part should be die cut or laser cut?
That’s okay. Material, geometry, quantity, tolerances, and tooling economics all affect the decision. Mag-Knight offers both die cutting and laser cutting and can evaluate the appropriate process for your application.
Can you quote a gasket from a sample?
A physical sample can be useful when a drawing isn’t available. Provide as much information as possible about the material, thickness, application, and quantity.
Should I provide my annual quantity?
Yes, if you know it. Annual usage can be particularly helpful when evaluating tooling and production economics.
Do I need to specify every tolerance?
No. Identify the dimensions that are functionally critical. Applying extremely tight tolerances to every dimension can make a part unnecessarily difficult or expensive to manufacture.
How quickly can I get a quote?
Mag-Knight’s website currently advertises a fast quote process, and the quotation page is the best place to submit the drawing and project information for evaluation.
Ready to Request a Die-Cutting Quote?
The easiest way to get started is to send us what you have.
If you have a complete drawing, include it.
If you have a CAD file, include it.
If you have a physical sample, tell us.
If you’re unsure about the material or manufacturing process, explain what the part needs to do.
We’ll use that information to evaluate the material, tooling, manufacturing process, and production requirements.
Skip the wait and get an instant die price from your PDF or DXF by using our new Instant Online Estimator.
A steel rule die about the size of a piece of paper, with a few simple cut lines or holes, typically runs around $200. Price goes up from there as the part gets bigger, the shape gets more complex, or the material gets harder to cut. Below is what actually drives that number, using how Mag-Knight prices dies day to day.
The Baseline: What a Simple Die Costs
For a paper-sized die with a handful of straight or gently curved cut lines, $200 is a realistic starting point. That price covers the steel rule itself, bending it to your shape, and mounting it into a base ready to run on press. From there, three things move the price: size, feature count, and material hardness. Our custom die cutting page has more on how we scope a new die once we see your drawing.
What Drives the Price Up
Size and feature count are the most intuitive factors: a bigger die needs more steel and more bending, and more cut lines, perforations, or crease lines mean more setup work before the die ever touches a press.
Material hardness is the less obvious one, and it matters more than most people expect. Softer materials like foam and soft rubber cut cleanly with a thin rule, but harder materials such as hard plastics and harder-durometer rubbers need a thicker rule to hold up under repeated impact. Thicker rule costs more outright, and it also cannot bend into fine detail as easily as thin rule can, which limits how intricate a shape can be for a given material.
Material Type
Typical Rule Thickness
Minimum Bend Radius
Fine Detail Capability
Soft foam, soft rubber
Thin rule
1/16″
High, tight curves and fine features are practical
Hard plastics, harder rubbers
Thick rule
3/32″
Lower, sharp inside corners and tiny features get harder to hold
If your part has fine internal detail and needs to be cut from a harder material, that combination is usually where die cost climbs the most, since it can mean designing around a larger minimum bend radius rather than just paying more for steel.
Why Rule Thickness Matters for Your Design
The practical takeaway for engineers: if your material is on the harder end, design features with a bend radius at or above 3/32″ wherever possible. Trying to force a tight radius into thick rule usually means either a redesign later or a die that doesn’t hold up as well in production. If you’re not sure where your material falls, our engineering library has additional reference material on rule selection and design-for-manufacturability, and it’s worth a look before finalizing a drawing.
You Own the Die You Pay For
When Mag-Knight builds your die, you own it. You’re paying for the tooling, so the tooling is yours, the same way it would be if you commissioned any other custom tool. What’s different is that we store it in-house at no extra charge, so it’s ready to run again the moment you place a reorder rather than needing to be rebuilt or shipped back and forth. That’s part of why getting a die scoped correctly the first time matters. It’s not a one-time expense, it’s an asset that sits on our shelf working for you on every future order.
How Long Does a Die Last?
A properly maintained die can produce tens of thousands of impressions before it needs rework, though the exact number depends heavily on the material being cut and how the die is run. Harder materials wear a die faster than soft ones, which is another reason the rule-thickness decision at the start matters for total cost over the life of the tooling, not just the upfront price. Proper storage and handling between runs, which we manage as part of keeping your die in-house, also extends usable life meaningfully compared to a die that gets shipped and reinstalled every order.
Want to Go Deeper on Die Design?
If you want to understand die design beyond pricing, Mag-Knight has a full video series on die design available in the sidebar of our website, covering rule selection, bend radius, and layout considerations in more depth than a single blog post can. It’s a good next step if you’re designing a part in-house before sending us a drawing.
Getting an Accurate Die Quote
Because size, feature count, and material all affect price, the fastest way to get a real number instead of an estimate is to send your drawing and material spec through our quotation page. If you’re still finalizing the design, our rapid prototyping option lets you validate the part with laser cutting first, so you’re not paying for a die until the design is locked. For a broader look at how tooling and production cost combine into a per-part price, see our full cost breakdown.
Frequently Asked Questions
How much does a basic custom die cost? A steel rule die about the size of a piece of paper with a few simple features typically costs around $200. Larger or more complex dies cost more.
Why do harder materials cost more to tool for? Harder materials like hard plastics and higher-durometer rubbers require thicker steel rule to hold up under repeated cutting. Thicker rule costs more and cannot be bent into as fine a detail as thinner rule used for softer materials.
What is the minimum bend radius for a die? For softer materials cut with thin rule, a bend radius around 1/16″ is typical. For harder materials requiring thicker rule, the minimum bend radius is generally 3/32″.
Who owns the die after it’s made? The customer does. Since you pay for the tooling, it belongs to you. Mag-Knight stores it in-house at no extra charge so it’s ready for future reorders.
How many parts can a single die produce? A well-maintained die can typically produce tens of thousands of impressions, though the exact figure depends on the material being cut and how the die is used and stored between runs.
Does die storage cost extra? No. Mag-Knight stores customer-owned dies in-house as part of the service, so reorders don’t require rebuilding or reshipping tooling.
Where can I learn more about die design before I submit a drawing? Our website’s sidebar hosts a full video series on die design covering rule selection, bend radius, and layout. Our engineering library also has written reference material on the same topics.
Ready to find out what your die will cost? Request a quote with your drawing and material, or reach out through our contact page if you’d like to talk through the design first.
Engineers evaluating die cutting cost for a new part almost always ask the same two questions: what does the tooling cost, and what does each part cost once it’s running. Both answers depend less on the material and more on two numbers — the price of the die itself, and the shop’s hourly production rate. Here’s how those numbers actually work, using real figures from how Mag-Knight prices jobs.
Tooling Cost: What a Die Actually Costs
For a steel rule die sized to a standard sheet (“paper size”) with a moderate number of features — cut lines, perforations, creases — tooling typically runs $200–$250. That’s a one-time cost tied to the die, not to the part count, which is why die-cut tooling is so much cheaper to justify than injection-mold tooling for short and medium production runs.
A few things that move that number:
Feature count. More cut lines, tighter internal features, or multiple die stations (cutting + creasing + perforating in one pass) add to the base price.
Die size. A die scaled to a full sheet costs more than one for a small part, though not proportionally — most of the cost is in machining the rule pattern, not the steel blank.
Material-specific tooling. Rotary dies for high-volume web-fed production cost more upfront than steel rule dies but pay that back in cycle time at volume.
See custom die cutting for how we scope tooling on a new job, or if you’re still validating a design, rapid prototyping skips the die entirely by laser-cutting your first parts.
Production Cost: The $100/Hour Number
Once the die exists, part cost comes down to press time. Mag-Knight targets $100 per hour of production time — a number we hold to deliberately, because it’s the lever that turns a $200 die into pennies-per-part pricing once you’re running any real volume. A press that’s cutting continuously at $100/hr can produce hundreds of parts in that hour depending on part size and material, which is where the per-part price actually comes from: hourly rate divided by parts-per-hour, not some fixed “die cutting is expensive” assumption.
This matters because engineers often compare die cutting to laser or waterjet cutting on a per-part basis without accounting for the fact that die cutting’s hourly rate is doing the same job other trades charge far more for.
How $100/Hour Compares to Other Skilled Trades
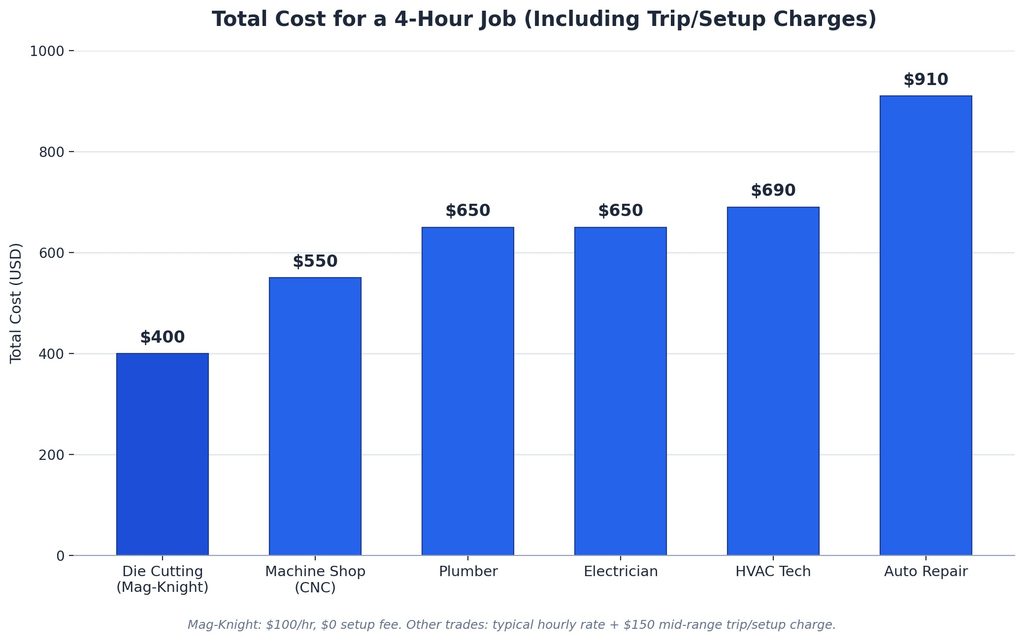
$100/hr looks reasonable enough on its own, but it stands out once you set it next to what other skilled trades charge for comparable expertise and equipment investment. Auto repair, for example, commonly runs around $190/hr at the higher end of the market in 2026. Electricians, plumbers, and HVAC technicians typically fall in a $100–$150/hr band depending on region and specialty, and a general machine shop doing CNC work is often in a similar range, closer to $75–$125/hr. Mag-Knight’s $100/hr sits at or below all of them, without the setup-fee-free pricing model or in-house engineering review included at no extra charge.
(Rates shown are general industry ranges for comparison purposes and vary by region and shop.)
Hourly rate alone doesn’t tell the full story, though. Most service trades also charge a trip or setup charge — typically $50–$250 — just to show up and begin work, on top of the hourly rate. Mag-Knight doesn’t charge this. There’s no setup fee, no trip charge, no minimum order fee — the $100/hr production rate is the whole cost of press time.
That difference compounds on any real job. Here’s what a 4-hour job actually costs once the trip/setup charge (using a $150 mid-range figure) is factored in:
Even against a machine shop billing the same $100/hr rate, Mag-Knight comes out lower on total job cost simply because there’s no setup fee added on top. The gap widens further against trades that both charge more per hour and add a trip charge on every visit.
The takeaway isn’t that die cutting is unusually cheap in isolation — it’s that $100/hr buys you a process capable of producing hundreds of finished parts per hour, not one repair or one service call. That’s what actually drives the per-part cost down at volume.
Estimating Your Total Part Cost
A rough formula for budgeting a new part:
Total cost ≈ Die cost + (Press hours × $100) ÷ Quantity
For example: a $225 die, 2 hours of press time producing 2,000 parts, works out to roughly $0.21 per part in tooling and production combined — before material. Material cost is added separately and varies by type; see suitable materials for what we stock and typical pricing tiers.
For parts involving metal layers or laminates, metal cutting and gaskets have their own typical cost ranges since tolerance and layer count affect both tooling and press time.
Getting an Accurate Quote
The fastest way to get real numbers instead of estimates is to request a quotation with your drawing and expected volume — tooling and per-part pricing both depend on specifics we can’t fully estimate from a material name alone. Our engineering library also has reference material on tolerances and design-for-manufacturability if you’re still finalizing the part.
Frequently Asked Questions
How much does a die cost for a small part? For a standard paper-sized steel rule die with moderate features, expect roughly $200–$250. Simpler dies with fewer features can run lower; dies with many stations (cut, crease, perforate) or tight tolerances can run higher.
Is die cutting cheaper than laser cutting at volume? Generally yes, once tooling is paid off. Laser cutting has no tooling cost but is slower per part, so it favors prototypes and short runs; die cutting favors medium-to-high volume where the die cost amortizes across many parts.
Why is Mag-Knight’s $100/hr rate relevant to my quote? It’s the production-time component of your per-part price. Because we don’t charge setup fees on top of it, the $100/hr rate is close to the full cost driver for your quote once tooling is accounted for separately.
Does a higher part complexity always mean higher cost? Not necessarily. Complexity affects tooling cost and press time, but a simple high-volume part can cost more in total than a complex low-volume part if the volume is high enough — it’s worth running both scenarios through the formula above.
How do I get an exact quote instead of an estimate? Send your drawing and expected quantity through our quotation page. Our engineering team reviews it and returns tooling and per-part pricing specific to your design.
Have a part in mind? Request a quote or reach out through our contact page and we’ll walk you through tooling and production cost before you commit.